Archive for the ‘computers’ Category


2012 was the year of the Raspberry Pi. This credit card sized computer has become a huge worldwide success.
Running GNU/Linux or other operating systems is an easy task, it just requires to flash an image on an SD Card, put it in the Raspberry and switch on the power supply.

The Raspberry Pi version B sports two USB 2.0 ports (only one on vers. A), a Fast-Ethernet connection (no network on vers. A), HDMI, Composite Video and stereo audio output.
It seems there’s nothing missing on the connection side. You can just plug a TV/monitor, a keyboard (and a mouse) and you’re ready to use the system.
You can also access it via SSH if you’re using Raspian or another OS that automatically enables the network connection and runs sshd or some telnet server at startup.
But, if you don’t have an available TV/monitor and you can’t connect to the Raspberry via network (because there is no DHCP server on your current network or there are no SSH/telnet servers running on the OS), your last chance is a serial console.

I’ll leave the basics to this simple and short article by Joonas Pihlajamaa: http://codeandlife.com/2012/07/01/raspberry-pi-serial-console-with-max3232cpe/
In a nutshell, the Raspberry Pi does have a serial port and a serial console is usually enabled by default by the OS on it, but there isn’t a standard UART/RS-232 connector. Two pins of the GPIO header must be connected to a level shifter like the Maxim MAX3232 in order to have a fully working RS-232 connection.

While the solution by Joonas Pihlajamaa works pretty well, I decided to make some changes:

  • I wanted an interface circuit with a standard DB-9 male connector. This way I can just change some settings, disable the serial console and use the circuit as a simple serial port for the Raspberry PI.
  • I wanted something like an Arduino’s shield, to just plug over and be ‘solid’ with the Raspberry.
  • I wanted the other GPIO pins to be available for other connections, like displays, I2C devices, RTC modules, etc.
  • I wanted the two pins of the soft-reset headers to be available for use even with the circuit plugged over.
  • I also wanted to use the circuit as a standalone RS-232/3.3V level converter to be able to connect to other embedded systems’ serial consoles (like the serial console found in many routers).
  • In the end, I came out with this solution, made with a MAX3232 compatible IC (the cheaper and more versatile SP3232ECP), some stackable headers, the usual five 100nF capacitors and a DB-9 male connector coming from a scrapped old motherboard.

    Serial Port Circuit mounted over a Raspberry Pi B rel. 2

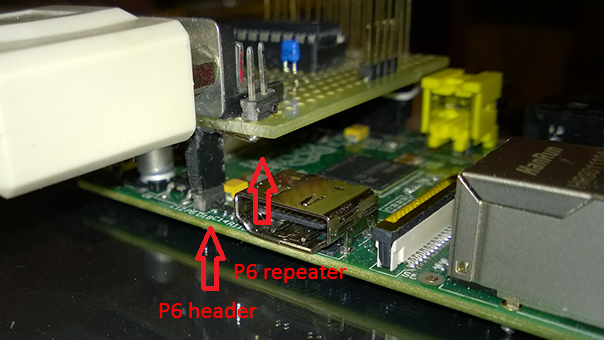
    The P6 header “repeater” (as I call it) also serves to support the circuit on the side of the DB-9 connector.
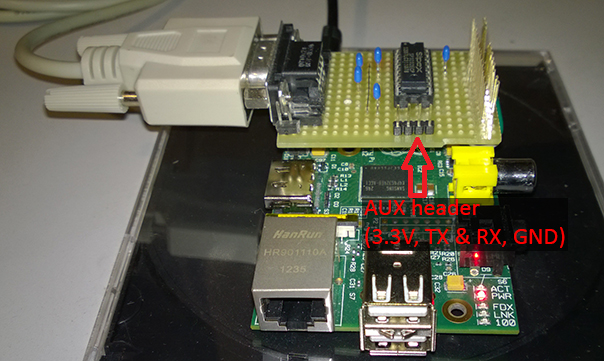
    A four pin AUX header is also provided for standalone use, with 3.3V, GND, RX and TX connected.
    24 out of 26 GPIO pins are present on the circuit. Of course GPIO pins 8 and 10, TX and RX, are not available for other connections.

    Serial circuit P6 header detail
    Serial circuit AUX header detail

    I’m currently trying the adapter on the Raspberry and seems to be working well. On the PC I’m using an old Prolific USB-to-Serial adapter with a null-modem cable.

    Bye


    For various reasons, I need to use OpenVPN at the university to be able to connect to the internet when I’m connected to a wired connection.
    I don’t like OpenVPN on Windows, primarily because it’s a software created for *nix systems and doesn’t run very well under Windows so it needs a lot of configuration under certain circumstances and so on.
    Nevertheless, OpenVPN works by creating an IPv4 Point-to-Point connection using a /30 subnet between the server and the client so, for instance, if the server, on the Point-to-Point connection, has the address 192.168.2.1, the client will have 192.168.2.2, the subnet itself will be 192.168.2.0 and the broadcast address will be 192.168.2.3.

    If you’re using Oracle VirtualBox or VMWare Player, you can simply configure the network adapter of the virtual machine to manage a NAT themselves. If the host has internet access, guest operating systems will be able to connect via a NAT hidden to (but usually customizable by) the user.

    But what if you’re using Hyper-V? Hyper-V has been designed for datacenter operations on Windows Server, where dedicated physical routers would manage routing, NAT etc.
    This brings a lot of really cool features like directly connect a virtual machine to a FCoE SAN or managing virtual switches and other stuffs, as expected from an enterprise-class hypervisor.

    Supposing that, like me, you’re running Windows 8 / 8.1 with Hyper-V on a laptop (I need it for the Windows Phone 8 emulator) and you’re connecting using some kind of PtP connection, like OpenVPN or a simple PPPoE modem, you need to configure a NAT on your system.
    This despite the fact that you won’t always need it, that will not work for every wireless or wired connection you’re gonna use and that there is a really big problem ahead, but let’s talk about this later.

    Creating a NAT for your virtual machines it’s pretty easy.
    Just open the Hyper-V management console, create a new virtual switch connected to an internal network (call it “Hyper-V NAT” or something like that), then open the Control Panel, open Network Connection and Sharing Center and enable the Internet Connection Sharing for the PtP connection you’re using and select as the “domestic network” the “Hyper-V NAT” adapter.

    By doing this, Windows will enable packet forwarding, will set the IP address of the “Hyper-V NAT” adapter to 192.168.137.1/24 and will enable a DHCP & DNS service on the same adapter.
    Virtual Machines connecting via the “Hyper-V NAT” adapter will automatically get their network configuration and will be able to surf the web (and usually download several hundred MBs of updates on their first run).

    Seem easy, huh? Well, it is. You can also change the switch to which a VM is connected when it’s running, so if you’re moving to a place when your PtP connection is not needed you can simply connect the VM to another virtual switch.

    That’s fine, really fine, until someday you need to share the 3G/4G connection of your Windows Phone 8 with your laptop.
    How does it work? Easy. Your WP8 device turns into a wireless router with a built-in DHCP & DNS service.
    The Wi-Fi adapter IPv4 address of your WP8 device is set to 192.168.137.1/24 and your laptop will get the network configuration automatically by your phone.
    Right?

    NO.

    Your wireless adapter is set as the following:
    IPv4 address: 192.168.137.2 ( or .3, or .42, etc. automatically assigned by DHCP of your Windows Phone)
    Subnet Mask: 255.255.255.0 (or /24, by DHCP)
    Default Gateway: 192.168.137.1 (by DHCP)

    but your “Hyper-V NAT” adapter is set as the following:
    IPv4 address: 192.168.137.1 (automatically set by Windows Internet Connection Sharing service)
    Subnet mask: 255.255.255.0 (or /24, always assigned by Windows ICS service)
    Gateway: none (or 127.0.0.1, but it doesn’t matter).

    That’s not gonna work. What your WP doesn’t know is that it’s telling your laptop to use itself as gateway.

    The easy workaround is to disable the “Hyper-V NAT” adapter when you’re tethering your connection to your laptop, and that works.

    Or, you can choose to solve this problem, by telling Windows ICS to use a different subnet to share the connection.
    Because 192.168.137.0/24 is not really an “exotic” subnet, I decided to use the 172.31.137.0/24 subnet (yes, /24, not that you can select a different netmask anyway).
    To change these values, you need to manually edit the Registry’s values located in Computer\HKEY_LOCAL_MACHINE\SYSTEM\CurrentControlSet\Services\SharedAccess\Parameters.
    Change ScopeAddress, ScopeAddressBackup and StandaloneDhcpAddress accordingly to your needs.

    Try to select a subnet you’re almost sure you’ll never use and you should be fine until IPv4 will be deprecated (HAH!).

    Have fun!

    Bye


    Gen 27

    Exactly one month ago I received my Acer Iconia W510, because of a partnership between Acer and Microsoft, which I want to thank both one more time.
    The Iconia W510 features a brand new Intel Atom Z2760 “Clover Trail” SoC with 2 GiB RAM and a 32 GB SSD.
    With a 1366×768 10″ multitouch display and a detachable keyboard it’s one of the first platforms where Windows 8 can show its full potential.
    Following a rather new tradition, the Iconia has been named Harrier and has joined my main pool of computers, composed by Hornet ( my laptop ) and Raptor ( my workstation ).

    I started working on x86 system in 1994 and didn’t have any occasion to work on other platforms until 2008 when I got my first, used, UltraSPARCv9 workstation. I still was a Windows user nevertheless and as such I always had x86 ( and x64 ) systems to run the various version of Windows I used during the last 19 years.

    As a result, I was very interested about the new Windows RT operating system for ARM SoCs.
    I had the opportunity to try it and, even with the limitation of not being able to install any desktop application, there is still a desktop, there are still both command prompt and PowerShell that can run with administrative privileges, there are the usual command line utilities like netsh and a lot of other things which make Windows RT a “complete” operating system.
    Not to mention Windows RT comes with Office H&S 2013.

    Windows on x86 hardware nonetheless is another story, especially if you are a Power User like me.
    For instance, this is my home’s wokspace. The W510 fits nicely on the left of Raptor‘s main screen.

    My desk with two PCs and the Iconia W510

    Being able to run the full range of 32 bit applications for Windows in the world is priceless. There are scenarios where the need to install software like PuTTY or OpenVPN, for instance on UNIX or *nix-based workplaces, overcome the capabilities of any Windows RT device.
    I installed Visual Studio on my Iconia last week and now I’m able to do much of the work I already do on my laptop or my workstation. Of course I can’t run the WP8 emulator, but I can still write down some ideas into code anywhere I am ( with the help of Visual Studio’s IntelliSense ).

    One thing that was really unexpected is the battery life. It’s amazing. I can use it for two whole days without the need of charging the two batteries ( one in the unit, one in the detachable keyboard ).
    I was really surprised, considering that my dad’s Intel Atom based netbook, running Windows 7, could at least last 6 to 7 hours, maybe 8 with an aggressive energy-saving policy.
    The idea to put another battery pack in the keyboard was excellent. When using the Iconia with the keyboard, or while using the keyboard as a stand, the internal battery will be depleted last, when there’s no more charge in the keyboard’s battery.

    The screen is large enough to be used for productivity tasks while, having a 16:9 A/R, it’s little less suited for reading fixed A4 documents. On the other end is comfortable enough to read e-books or other contents with a variable layout, better suited for portrait orientation on a 16:9 screen.
    The minimum screen brightness is low enough to not strain your eyes while reading. BTW, if reading during nighttime without any other light source, it’s better to switch to a white on black, or even a grey on black color scheme if the app / website allow this.

    Design’s fairly good, a little scratch-prone IMHO. I would have put a regular USB port on the side of the unit instead of a microUSB one. The keyboard has another USB port so there is a total of two ports.
    A male microUSB to female USB-A dongle is bundled with the device, so this isn’t a big issue, but personally I hate dongles since time of PCMCIA network card ( because there’s some magic around them that make them disappear sooner or later ).

    The embedded NFC and Bluetooth could be a good option to attach a mouse without sacrificing one of the two precious USB ports, while BitLocker can use the integrated TPM module to securely encrypt data.

    The really big drawback of the unit Acer sent me are the only 32 GB of internal storage that leave really little space for documents and personal data once App and other software ( like Visual Studio Express or Office standard ) start being installed.
    There is a microSD slot that accept cards up to 32 GB ( 64 GB cards are unsupported  ), so data, music, pictures, etc. can be stored there.

    I had some stability issues during the first week that were greatly reduced with the following driver updates.
    I haven’t had one since the last driver update of January 13.

    Overall, being my first tablet, I’m pretty satisfied of it. Of course I have different needs from standard users. I wouldn’t have cared if the Iconia would have weighted 1 lbs more or would have been 1/4″ ticker but maybe having a mSATA SSD instead of the one soldered on the mainboard.

    In the end, I think the Acer Iconia W510 is a very good product, because before being a tablet, is a PC.
    That means, when choosing a tablet, that the Iconia ( as well as the other “Clover Trail” based tablets ) has no restrictions on any App’s store or market, can be fully integrated in a business / enterprise environment when running Windows 8 Pro ( like mine ) and can be connected to any device with available drivers for Windows 8 / 7 or Vista.

    Many friends of mine are starting to consider this product a good balance between a high-end netbook and a mid-range tablet. Of course high-end x86 tablets offer more, but with an higher price. Acer itself produces the Iconia W700 which belong to another class of products.
    After a single month some things start to be addictive: this a sign that the product is good!

    Again, many thanks to Microsoft Italy and Acer Italy for this amazing Iconia W510.

    Bye


    Feb 4

    Last year I wrote how to create and configure an IPv6 over IPv4 tunnel with Hurricane Electric.
    Now I’m gonna write how to configure a Linux host with two NICs as an IPv6 router using an HE tunnel when behind a NAT-router.
    The examples here are referred to a Debian 6 Linux distribution and may be sligthly different for other distros or *BSD OSs.

    Let’s suppose your current IPv4 network is a classical 172.16.0.0 with a 255.255.0.0 netmask ( /16 in short ), and that your IPv4 NAT-router is located at 172.16.255.254.
    The first thing you need to do is to configure one of the interfaces of your IPv6 router, let’s say eth0, with a fixed IPv4 address in the same subnet of your router, like 172.16.255.253.
    Then you have to make sure that your NAT-router forward protocol 41 to your IPv6 router. If this is not the case, you can simply put you IPv6 router in the DMZ. Be careful when you do that! Be sure to apply strong IPv4 firewall policies and keep the daemons listening to that interface at the minimum, maybe on non-standard ports.
    After configuring the IPv6 router default IPv4 route ( to your NAT-router of course ), test if you can reach an address outside the local subnet, like 8.8.8.8 ( Google Domain Name Server ).
    You’ll also like to assign an IPv4 address to the other network interface, for instance eth1, to allow some daemons to listen to an IPv4 local address ( like sshd or named for IPv4 ).

    Debian and other Debian-related distros usually store the network configuration inside the /etc/network/interfaces file.

    # This file describes the network interfaces available on your system
    # and how to activate them. For more information, see interfaces(5).
    
    auto lo
    iface lo inet loopback
    
    auto eth0
    iface eth0 inet static
       address 172.16.255.253
       netmask 255.255.0.0
       gateway 172.16.255.254
    
    auto eth1
    iface eth1 inet static
       address 172.16.255.252
       netmask 255.255.0.0

    In the tunnel configuration page on the HE’s website you can find the routable /64 subnet. Mind the difference between the tunnel IPv6 addresses, that usually are something like 2001:1234:5678:abc::1 and 2001:1234:5678:abc::2, and your routable IPv6 subnet that will be something like 2001:1234:5679:abc::.
    The IPv6 address of eth1 is static ( this is a router after all ) and  must belong to your routable subnet. You can choose of using a simple address, like 2001:1234:5679:abc::1, or, if you’re a bit paranoic, you can randomize it to something like 2001:1234:5679:abc:5f32:9b8c:d12e:15fa.
    Because your routable subnet is not gonna change unless you destroy your HE’s tunnel and create a new one, you can configure the eth1 IPv6 address as static and put the configuration inside /etc/network/interfaces, by adding the following lines:

    iface eth1 inet6 static
       pre-up /sbin/ip6tables-restore < /etc/iptables/ipv6firewall
       address 2001:1234:5679:abc:5f32:9b8c:d12e:15fa
       netmask 64

    The second line is needed to enable the ip6tables firewall.

    The configuration for ip6tables is based on a more or less ‘standard’ requirement: all the hosts behind the router have unlimited access to the internet on every protocol or port while they’re not reachable from the rest of world with the exception of some ICMPv6 messages.
    Just to avoid some types of DOS attack, I’ve decided to limit the amount of ICMPv6 echo requests the router ( and the network behind ) is gonna receive.
    The content of the /etc/iptables/ipv6firewall file is the following:

    # Generated by ip6tables-save
    *filter
    :INPUT DROP [23:2392]
    :FORWARD DROP [4:320]
    :OUTPUT ACCEPT [30:2888]
    -A INPUT -i lo -j ACCEPT
    -A INPUT -i sit1 -p ipv6-icmp --icmpv6-type echo-request -m limit --limit 5/sec -j ACCEPT
    -A INPUT -i sit1 -p ipv6-icmp --icmpv6-type echo-request -j DROP
    -A INPUT -i sit1 -p ipv6-icmp -j ACCEPT
    -A INPUT -i eth1 -j ACCEPT
    -A INPUT -i sit1 -m state --state RELATED,ESTABLISHED -j ACCEPT
    -A FORWARD -o sit1 -j ACCEPT
    -A FORWARD -i sit1 -m state --state RELATED,ESTABLISHED -j ACCEPT
    -A FORWARD -i sit1 -p ipv6-icmp --icmpv6-type echo-request -m limit --limit 5/sec -j ACCEPT
    -A FORWARD -i sit1 -p ipv6-icmp --icmpv6-type echo-request -j DROP
    -A FORWARD -i sit1 -p ipv6-icmp -j ACCEPT
    COMMIT

    Then you need to enable IPv6 forwarding at boot time by putting the following file ( you can name it as you want, as long as it ends with .conf; I’ve called it ipv6_forwarding.conf ) inside the /etc/sysctl.d/ directory:

    # /etc/sysctl.d/ipv6_forwarding.conf
    
    net.ipv6.conf.all.forwarding = 1

    The next thing to configure is the router advertisement daemon, that can be installed ( as root ) using the command:

    # apt-get install radvd

    The configuration file is /etc/radvd.conf and should be similar to this one:

    interface eth1
    {
       AdvSendAdvert on;
       AdvManagedFlag on;
       MinRtrAdvInterval 5;
       MaxRtrAdvInterval 15;
       AdvLinkMTU 1280;
       prefix 2001:1234:5679:abc::/64
       {
       };
    };

    Some flags are required ( like ‘AdvLinkMTU’ set to 1280 ) for the tunnel to work, some are optional ( like ‘AdvManagedFlag’ ). Maybe next time I’ll wrote how to configure a DHCPv6 server. DHCPv6 is a little more complex than DHCPv4 also because it must be deployed side-to-side with router advertisement, but allows far greater flexibility than its IPv4 counterpart.
    In the meantime, with IPv4-reachable nameservers answering with AAAA records, there’ll be no real need for IPv6-reachable nameservers on the short term ( that is, until IPv4 will be the mainstream protocol ).

    The last part is to set up the tunnel using a shell script. Actually, two scripts are used. The first one contains only variables like the username, the tunnel ID and the password that should be passed via http on SSL to configure the firewall at Hurricane Electric and tell it our public IP.
    The file I created is named HE_personal.sh and is stored inside /root with 0700 permission. The content is the following:

    #!/bin/sh
    
    USERNAME=■■■■■■■■
    PASSWORD=■■■■■■■■
    TUNNELID=■■■■■■■■

    The other file is HE_tunnel_setup.sh that contains the real commands needed to create the tunnel. I’ve decided to launch it manually ( must be executed as root ) but you can decide to launch it at boot time writing an init.d script or by simply using another ‘pre-up’ directive in /etc/network/interfaces. The content is the following:

    #!/bin/sh
    
    . /root/HE_personal.sh
    
    rm ipv4_end.php*
    wget --no-check-certificate https://$USERNAME:$PASSWORD@ipv4.tunnelbroker.net/ipv4_end.php?tid=$TID
    
    ifconfig sit0 up
    ifconfig sit0 inet6 tunnel ::123.45.678.90
    ifconfig sit1 up
    ifconfig sit1 inet6 add 2001:1234:5678:abc::2/64
    route -A inet6 add ::/0 dev sit1

    The –no-check-certificate flag for wget is needed because of a little issue with an HE’s SSL certificate. Mind the prefix of the sit1 interface and the remote endpoint of the IPv4 tunnel.

    After rebooting the IPv6 router, ip6tables and radvd should be already up and running. After launching the script the tunnel should be configured without issuing any other command.

    To check if the hosts had received an IPv6 Link-Global address you can use:

    $ ifconfig -a

    under any UNIX, Unix-like or Linux operating system or

    > ipconfig /all

    under Windows ( any version after Windows XP SP0 ).

    Then you can test if the hosts can reach the IPv6 internet using ping6 under any UNIX, Unix-like or Linux operating system ( excluding Oracle Solaris ) or using ping under Windows or Solaris.

    Bye


    Ott 3

    Being a Microsoft Student Partner simply means I like most of Microsoft’s technologies and products because they work the way I expect them to work, my expectations based on a 17 years old experience with Microsoft’s products.

    For instance, as far as other desktop OSs can arrive, nothing, in my opinion, beats Windows 7 nowadays.
    MacOS X is a very good OS, but as long as it’ll run only on Apple hardware, I’ll never gonna use it.
    GNU/Linux-based distros like Red Hat, Ubuntu, Fedora, OpenSUSE, Debian, etc. are today very good OSs, but there’s an overall lack of agreement between developers and, even worse, an incompatibility issue between licenses that lead to a “reinvention of wheel” time after time ( the Big example: ZFS and btrfs ).

    So, while I usually like Microsoft products, sometimes I think that some little or big decisions have been made without thinking too much to a certain part of the users.

    My first criticism was about Windows Phone 7, that is a really good mobile OS for the average user. But as long as I want to: sync my contacts with Outlook rather than Windows Live, join a domain, run native C++ applications and other things, Windows Phone 7 is not a choice for me. I’m still fine with Windows Mobile 6.x.

    But MetroUI caught my attention when I first tried the developers’ preview of Windows 8 some days ago.
    The concept behind MetroUI is the “unification of the user experience”, a marketing expression used instead of “users are getting more and more lazy and they don’t want to bother about what’s under the hood” ( meaning they don’t care what they’re using: a mobile phone, a desktop computer, an ATM or a washing machine ).
    Many people think touchscreens were one of the biggest revolution in the late ’00s market. Probably they’re the same people whose jaw drops on the floor when I tell them my first experience with a touchscreen was in 1994, in a ship command bridge on a green phosphor CRT monitor used to manage the course ( Yeah, I actually steered a 200 yards-long ship ). By the way, they’re right if considering only the consumer market.
    The idea of unifying the UI between “handy” devices ( mobile phones and tablets ) is hardly new and, most important thing, it works. After all, they’re similar and they’re expected to work in a similar way.
    But, in my opinion, if the differences between a mobile phone and a tablet are like the differences between a car and a van, those between a tablet and a PC are more like those between a GA aircraft and an airliner.
    They’re not similar, they’re not expected to be used in the same way. I don’t expect to find a manifold pressure gauge in the cockpit of a Boeing 737 ( or an ATR-42 or an Airbus A380 ) in the same way I don’t expect to find a FMS console in a Cessna 172 ( or in a Piper PA28 ).

    Saying that I don’t like MetroUI would be wrong. I just think that MetroUI has no reason to be the default UI on a desktop OS. I also think that standard utilities should remain non-Metro applications. I find unacceptable that the remote desktop connection client is available only as a MetroUI application on a desktop machine, as I find wrong not giving the user the option to actually kill the application, even by some abstruse key combination, I don’t care, and not just suspending it.
    For seventeen years I closed an application in Windows by clicking on the top left ( top right starting with Windows 95 ) corner button of the application window, or by pressing Alt + F4. In MetroUI I can’t quit application like this. I find it a bit ( well more than just a bit ) disappointing.

    In the end, considering that there’s a lot of research behind the dvelopment of an operating system ( and Microsoft really care about what users think, or wouldn’t have released Windows 8 Developer Preview publicly ), what I’m starting to think is that average users are beginning to be afraid ( I could have used the word “tired”, but I didn’t ) of the keyboard as well as, following Windows 95, users started to be afraid of the command line.

    What I’d really like, as a power user, as an enthusiast and as an experienced user, is a choice. As there are six versions of Windows 7, I’d like the Professional and Enterprise versions of Windows 8 use explorer as the default UI instead of MetroUI.
    We will wait for the beta versions to see what will appens.

    Bye


    Last night I wanted to try something new on Mirage, my Sun Ultra 5. After changing the configuration of the SCSI disks, moving some drives between the two channels of the controller ( and changing the correspondingly devaliases in the NVRAM with several nvunalias / nvalias commands ), I thought about installing NetBSD-current ( currently 5.99.55 ).

    This wiki list a serie of commands that would compile and install NetBSD-current assuming that a release of NetBSD is already running. So because I already had a NetBSD 5.1 running on Mirage, I thought of following the “short way”… only to find out that fetching the sources via anoncvs took nearly 4 hours. I’m not blaming anoncvs, because trying to fetch the tarball and extracting all the files took nearly 2 hours two days later.

    Now, the most “interesting” thing is that the build script, before compiling the kernel and the userland, need to compile the compiler, because NetBSD 5.99 need GCC 4.5 compiled for the target architecture ( in this case, sparc64 ).
    I was just thinking to stay with 5.1 ( losing some opportunity offered by current, like some ZFS support etc. ), when I tought about doing some test on a VM in VirtualBox. During the installation process I choose to get the sets ( a bunch of tgz files ) from http rather than from the CD. Looking at the options for the http install, I tought of doing something “nasty”:

    using the 5.1 installer to install 5.99.

    It’s longer to explain than actually doing it, but this is possible because on the nyftp http mirror ( http://nyftp.netbsd.org/ ) inside the pub/NetBSD-daily/HEAD/ directory are stored the last five build of NetBSD-current. Inside each directory ( named after the date and time of build ), there are the directories for each architecture, containing the binary sets ( the bunch of tgz files ) that will be used from the installer.
    So, after changing the options in the installer accordingly to what is needed, the installation can start and will end with only two minor problems.

    The first one is that it’s not possible to set the root password, the second is that the rc_configured variable in /etc/rc.conf will not be changed by the setup program, resulting in a single user boot after reboot, with the root filesystem mounted in read-only.
    But these are problems that even a NetBSD newbie know how to solve ( If someone is interested in something like NetBSD-current, then a basic knowledge of vi and of the standard UNIX commands, like mount or passwd is take for granted ).

    Mirage is now running NetBSD-current with a LVM volume ( not as powerful as ZFS but require a lower overhead ) in the Sun StorEdge FlexiPack 599, and has been configured as a NFS ( Nightmare Network File System ) Server.

    Bye


    This article is a sort of “Post-it®”, a brief explanation of how to configure a network bridge with two NICs under CentOS 5.x / 6.x. After spending more than 10 minutes googling how to perform this task ( mainly reading about ( l ) users that didn’t have a clue about what a network bridge is or, worse, asking how to bridge n-thousand VM while performing routing having iptables misconfigured… ), I thought it was better to write everything down in “safe place”: what’s better than my blog?

    So, this is how I have made the bridge on Nighthawk ( a double Pentium III – 800 MHz with a Gig of RAM and a pair of UWSCSI3 disks ), under CentOS 6.0.
    The two NICs are both based on an Intel 82559 chip. The first one is integrated into the motherboard, while the second one is on a PCI slot.

    OBVIOUSLY, a network bridge has ONE MAC address ( could be the same of one of the two NIC or could be a different one ) and ONE IP address, unless your playing with aliased interface over a bridge, but this is not the case.

    The integrated NIC is eth0, the NIC on the PCI slot is eth1 while the network bridge is nbr0.

    So, these are the configuration files:

    # /etc/sysconfig/network-scripts/ifcfg-eth0
    DEVICE="eth0"
    HWADDR="00:30:48:AA:BB:CC"
    ONBOOT="yes"
    BRIDGE="nbr0"

    # /etc/sysconfig/network-scripts/ifcfg-eth1
    DEVICE="eth1"
    HWADDR="00:90:27:DD:EE:FF"
    ONBOOT="yes"
    BRIDGE="nbr0"

    # /etc/sysconfig/network-scripts/ifcfg-nbr0
    DEVICE="nbr0"
    TYPE="bridge"
    BOOTPROTO="dhcp"
    IPV6INIT="yes"
    IPV6_AUTOCONF="yes"
    ONBOOT="yes"

    The bridge takes its IP address via DHCP. If a static address is required, file ifcfg-nbr0 must be changed according to what is reported into the RHEL Deployment Guide.

    Bye


    Lug 27

    I know, it’s been a long long time. I’m sorry, but I’ve actually got many things to do and I’m unable to find the time to turn the 3 / 4 draft I already wrote into “real” articles.
    Probably you were expecting something on the end of the Shuttle era, the anniversary of the first landing on the moon, recent hauls… and you’re more or less right, just wait a little more.

    This post is just a reminder that was set 17 years ago ( yes, in 1994 A.D. ), when Lightning ( Intel 486DX2 ) was pretty new and when I first “flew” using Microsoft’s Flight Simulator 5.0, Spectrum HoloByte’s Falcon 3.0 and – the reason this post exists – Origin’s Strike Commander, the CD edition that included the “Speek Pack”, the “Tactical Operations” expansion and, of course, the July 2011 issue of Sudden Death… yeah, the July 2011 issue in 1994.

    Cover of Sudden Death - July 2011 issue

    Bye


    Mar 18

    This is my first post about IPv6 and, as you can read in the title, is gonna be the first of a serie.

    One thing that is driving me mad during these days is that on many sites, blogs, forums etc. there are a lot of explanations about how IPv6 works, but really few explanations on how to make it working.

    So now I’m not gonna explain what IPv6 is, or how it works, because I’ll assume that the reader has at least a basic IPv6, IPv4 and UNIX / NetBSD understanding.
    I’m gonna write down the steps I performed to get IPv6 connectivity ( assuming your ISP isn’t already giving you native IPv6 connectivity, otherwise you can stop reading now ) using a D-Link DSL-2640B aDSL modem-router with a standard firmware ( support IPv4 only ) and a NetBSD/i386 5.1 based router ( any computer with two NICs ).
    I currently have no firewall on the DSL-2640 and no services / daemons running on the NetBSD router.

    In this first post I will illustrate how to get IPv6 connectivity via a tunnel broker. There are many free services availables. I choose Hurricane Electric ( HE from now on ) just because a pair of friends already use it and told me that it works.

    The tunnel created with an HE’s endpoint is static and request that you have a public pingable IPv4 address.
    If you are behind a router that does NAT, like me, this could represent a problem, so I created this page to test if I can ping my public IPv4 address.
    The solution I found was to move the NetBSD router to the DMZ, so when someone ping my public address, actually it sends ICMPv4 requests to my NetBSD router.

    Creating a tunnel on the HE website is pretty simple, just look at the image below:

    Create tunnel with HE

    1. Click;
    2. Insert your public pingable IPv4 address

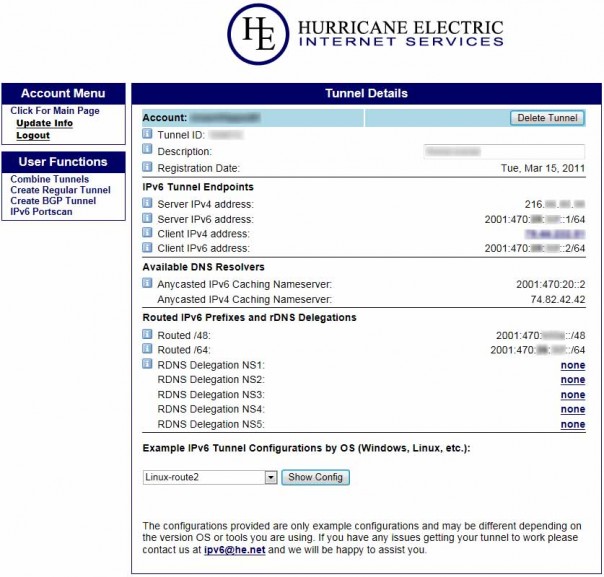
    HE tunnel details

    Just remember, for this specific configuration, when configuring the tunnel interface on the router, not to use your public IPv4 address but to use the private address of your IPv4 gateway. So, to create a tunnel in NetBSD ( 4.x or 5.x ) type the following as root:


    # ifconfig gif0 create
    # ifconfig gif0 tunnel $Your_IPv4_gateway $Server_IPv4_address
    # ifconfig gif0 inet6 $Client_IPv6_address $Server_IPv6_address prefixlen 128
    # route -n add -inet6 default $Server_IPv6_address

    The tunnel should be up and ready. Just try to send an ICMPv6 echo request to someone using ping6, like ipv6.google.com ( you have to create and configure /etc/resolv.conf first ).

    If you succeed, congratulations! You’re now on the IPv6 internet and halfway in configuring the router!

    In the next part I’m gonna explain how to enable routing, configure the router advertisement daemon and make the configuration permanent.

    Bye


    Feb 24

    Let’s start saying I’m really not a space enthusiast, although in my opinion the exploration of space and other planets is the future of humanity, so it could be interesting to know something about astronomy, astrophysics and space technologies.

    Back in 1994 Microsoft released Space Simulator. I’ve never used it but, as I’ve found on various sites and forums, seems that the space vehicles the user could fly were all fictional, and that atmospheric flight was not simulated.

    NASA reported that budget for the last STS mission, STS-135 / Atlantis, has been approved. Anyway, that means 2011 will be the year in which the Space Shuttle fleet will be decommissioned, after the final flights for Discovery, Endeavour and Atlantis.

    While looking for some Space Shuttle’s videos, I found some videos made with Orbiter, so I started searching some info about this program.

    Orbiter ( current version as of writing is Orbiter 2010 ), is a space flight simulator released for the first time in 2000. It simulates both space and atmospheric flight, it’s modular, so a large number of plugins and add-ons already exists, and it’s very realistic.
    It’s also free, and you can download it following the link on the official site.
    Without AA at low resolutions runs even on tomcat ( a laptop with a Pentium 4 2.4 GHz and 1 GB of RAM ).

    Atlantis in orbit with Canadarm ( in Orbiter 2010 )
    Coming from more than 15 years of flight simulators doesn’t help very much during the first flights. It’s actually better to forget how to fly aircrafts and start to learn almost everything from scratch. Furthermore, Orbiter use the metrical system while in aviation, apart from Russia and some other former Soviet republics, the most used system is the US customary one, especially for distance ( nm ), speed ( kts ) and altitude ( ft ).

    Let’s start saying that using orbiter is all but easy, so for the first flights, the Delta-glider is the best choice. This rocket-spacecraft is able to take off and land like an aircraft and has enough thrust not only to reach Earth orbit without using any booster, but also to change the orbit plane by several degrees ( something the OMS of an Orbiter can’t do ).
    After learning how to get into orbit, change the orbit plane and period in order to synchronize it with that of another spacecraft / satellite / space station ( it takes some weeks… ) and last but not least, how to perform a correct re-entry manouver ( to land where you want, when you want, possibly without burning ), it is possible to do simulate other stuffs, like flying with the Space Shuttle to repair Hubble or simulating a transfer to another planet ( using time warp of course ) or to the moon, maybe with the Apollo add-on.

    If you like new challenges and you don’t bother about learning a lot of things before even leaving the ground, I strongly recommend you to try Orbiter.

    Atlantis departure ( in Orbiter 2010 )

    Bye