Archive for the ‘howtos’ Category

Feb 4

Last year I wrote how to create and configure an IPv6 over IPv4 tunnel with Hurricane Electric.
Now I’m gonna write how to configure a Linux host with two NICs as an IPv6 router using an HE tunnel when behind a NAT-router.
The examples here are referred to a Debian 6 Linux distribution and may be sligthly different for other distros or *BSD OSs.

Let’s suppose your current IPv4 network is a classical 172.16.0.0 with a 255.255.0.0 netmask ( /16 in short ), and that your IPv4 NAT-router is located at 172.16.255.254.
The first thing you need to do is to configure one of the interfaces of your IPv6 router, let’s say eth0, with a fixed IPv4 address in the same subnet of your router, like 172.16.255.253.
Then you have to make sure that your NAT-router forward protocol 41 to your IPv6 router. If this is not the case, you can simply put you IPv6 router in the DMZ. Be careful when you do that! Be sure to apply strong IPv4 firewall policies and keep the daemons listening to that interface at the minimum, maybe on non-standard ports.
After configuring the IPv6 router default IPv4 route ( to your NAT-router of course ), test if you can reach an address outside the local subnet, like 8.8.8.8 ( Google Domain Name Server ).
You’ll also like to assign an IPv4 address to the other network interface, for instance eth1, to allow some daemons to listen to an IPv4 local address ( like sshd or named for IPv4 ).

Debian and other Debian-related distros usually store the network configuration inside the /etc/network/interfaces file.

# This file describes the network interfaces available on your system
# and how to activate them. For more information, see interfaces(5).

auto lo
iface lo inet loopback

auto eth0
iface eth0 inet static
   address 172.16.255.253
   netmask 255.255.0.0
   gateway 172.16.255.254

auto eth1
iface eth1 inet static
   address 172.16.255.252
   netmask 255.255.0.0

In the tunnel configuration page on the HE’s website you can find the routable /64 subnet. Mind the difference between the tunnel IPv6 addresses, that usually are something like 2001:1234:5678:abc::1 and 2001:1234:5678:abc::2, and your routable IPv6 subnet that will be something like 2001:1234:5679:abc::.
The IPv6 address of eth1 is static ( this is a router after all ) and  must belong to your routable subnet. You can choose of using a simple address, like 2001:1234:5679:abc::1, or, if you’re a bit paranoic, you can randomize it to something like 2001:1234:5679:abc:5f32:9b8c:d12e:15fa.
Because your routable subnet is not gonna change unless you destroy your HE’s tunnel and create a new one, you can configure the eth1 IPv6 address as static and put the configuration inside /etc/network/interfaces, by adding the following lines:

iface eth1 inet6 static
   pre-up /sbin/ip6tables-restore < /etc/iptables/ipv6firewall
   address 2001:1234:5679:abc:5f32:9b8c:d12e:15fa
   netmask 64

The second line is needed to enable the ip6tables firewall.

The configuration for ip6tables is based on a more or less ‘standard’ requirement: all the hosts behind the router have unlimited access to the internet on every protocol or port while they’re not reachable from the rest of world with the exception of some ICMPv6 messages.
Just to avoid some types of DOS attack, I’ve decided to limit the amount of ICMPv6 echo requests the router ( and the network behind ) is gonna receive.
The content of the /etc/iptables/ipv6firewall file is the following:

# Generated by ip6tables-save
*filter
:INPUT DROP [23:2392]
:FORWARD DROP [4:320]
:OUTPUT ACCEPT [30:2888]
-A INPUT -i lo -j ACCEPT
-A INPUT -i sit1 -p ipv6-icmp --icmpv6-type echo-request -m limit --limit 5/sec -j ACCEPT
-A INPUT -i sit1 -p ipv6-icmp --icmpv6-type echo-request -j DROP
-A INPUT -i sit1 -p ipv6-icmp -j ACCEPT
-A INPUT -i eth1 -j ACCEPT
-A INPUT -i sit1 -m state --state RELATED,ESTABLISHED -j ACCEPT
-A FORWARD -o sit1 -j ACCEPT
-A FORWARD -i sit1 -m state --state RELATED,ESTABLISHED -j ACCEPT
-A FORWARD -i sit1 -p ipv6-icmp --icmpv6-type echo-request -m limit --limit 5/sec -j ACCEPT
-A FORWARD -i sit1 -p ipv6-icmp --icmpv6-type echo-request -j DROP
-A FORWARD -i sit1 -p ipv6-icmp -j ACCEPT
COMMIT

Then you need to enable IPv6 forwarding at boot time by putting the following file ( you can name it as you want, as long as it ends with .conf; I’ve called it ipv6_forwarding.conf ) inside the /etc/sysctl.d/ directory:

# /etc/sysctl.d/ipv6_forwarding.conf

net.ipv6.conf.all.forwarding = 1

The next thing to configure is the router advertisement daemon, that can be installed ( as root ) using the command:

# apt-get install radvd

The configuration file is /etc/radvd.conf and should be similar to this one:

interface eth1
{
   AdvSendAdvert on;
   AdvManagedFlag on;
   MinRtrAdvInterval 5;
   MaxRtrAdvInterval 15;
   AdvLinkMTU 1280;
   prefix 2001:1234:5679:abc::/64
   {
   };
};

Some flags are required ( like ‘AdvLinkMTU’ set to 1280 ) for the tunnel to work, some are optional ( like ‘AdvManagedFlag’ ). Maybe next time I’ll wrote how to configure a DHCPv6 server. DHCPv6 is a little more complex than DHCPv4 also because it must be deployed side-to-side with router advertisement, but allows far greater flexibility than its IPv4 counterpart.
In the meantime, with IPv4-reachable nameservers answering with AAAA records, there’ll be no real need for IPv6-reachable nameservers on the short term ( that is, until IPv4 will be the mainstream protocol ).

The last part is to set up the tunnel using a shell script. Actually, two scripts are used. The first one contains only variables like the username, the tunnel ID and the password that should be passed via http on SSL to configure the firewall at Hurricane Electric and tell it our public IP.
The file I created is named HE_personal.sh and is stored inside /root with 0700 permission. The content is the following:

#!/bin/sh

USERNAME=■■■■■■■■
PASSWORD=■■■■■■■■
TUNNELID=■■■■■■■■

The other file is HE_tunnel_setup.sh that contains the real commands needed to create the tunnel. I’ve decided to launch it manually ( must be executed as root ) but you can decide to launch it at boot time writing an init.d script or by simply using another ‘pre-up’ directive in /etc/network/interfaces. The content is the following:

#!/bin/sh

. /root/HE_personal.sh

rm ipv4_end.php*
wget --no-check-certificate https://$USERNAME:$PASSWORD@ipv4.tunnelbroker.net/ipv4_end.php?tid=$TID

ifconfig sit0 up
ifconfig sit0 inet6 tunnel ::123.45.678.90
ifconfig sit1 up
ifconfig sit1 inet6 add 2001:1234:5678:abc::2/64
route -A inet6 add ::/0 dev sit1

The –no-check-certificate flag for wget is needed because of a little issue with an HE’s SSL certificate. Mind the prefix of the sit1 interface and the remote endpoint of the IPv4 tunnel.

After rebooting the IPv6 router, ip6tables and radvd should be already up and running. After launching the script the tunnel should be configured without issuing any other command.

To check if the hosts had received an IPv6 Link-Global address you can use:

$ ifconfig -a

under any UNIX, Unix-like or Linux operating system or

> ipconfig /all

under Windows ( any version after Windows XP SP0 ).

Then you can test if the hosts can reach the IPv6 internet using ping6 under any UNIX, Unix-like or Linux operating system ( excluding Oracle Solaris ) or using ping under Windows or Solaris.

Bye


Last night I wanted to try something new on Mirage, my Sun Ultra 5. After changing the configuration of the SCSI disks, moving some drives between the two channels of the controller ( and changing the correspondingly devaliases in the NVRAM with several nvunalias / nvalias commands ), I thought about installing NetBSD-current ( currently 5.99.55 ).

This wiki list a serie of commands that would compile and install NetBSD-current assuming that a release of NetBSD is already running. So because I already had a NetBSD 5.1 running on Mirage, I thought of following the “short way”… only to find out that fetching the sources via anoncvs took nearly 4 hours. I’m not blaming anoncvs, because trying to fetch the tarball and extracting all the files took nearly 2 hours two days later.

Now, the most “interesting” thing is that the build script, before compiling the kernel and the userland, need to compile the compiler, because NetBSD 5.99 need GCC 4.5 compiled for the target architecture ( in this case, sparc64 ).
I was just thinking to stay with 5.1 ( losing some opportunity offered by current, like some ZFS support etc. ), when I tought about doing some test on a VM in VirtualBox. During the installation process I choose to get the sets ( a bunch of tgz files ) from http rather than from the CD. Looking at the options for the http install, I tought of doing something “nasty”:

using the 5.1 installer to install 5.99.

It’s longer to explain than actually doing it, but this is possible because on the nyftp http mirror ( http://nyftp.netbsd.org/ ) inside the pub/NetBSD-daily/HEAD/ directory are stored the last five build of NetBSD-current. Inside each directory ( named after the date and time of build ), there are the directories for each architecture, containing the binary sets ( the bunch of tgz files ) that will be used from the installer.
So, after changing the options in the installer accordingly to what is needed, the installation can start and will end with only two minor problems.

The first one is that it’s not possible to set the root password, the second is that the rc_configured variable in /etc/rc.conf will not be changed by the setup program, resulting in a single user boot after reboot, with the root filesystem mounted in read-only.
But these are problems that even a NetBSD newbie know how to solve ( If someone is interested in something like NetBSD-current, then a basic knowledge of vi and of the standard UNIX commands, like mount or passwd is take for granted ).

Mirage is now running NetBSD-current with a LVM volume ( not as powerful as ZFS but require a lower overhead ) in the Sun StorEdge FlexiPack 599, and has been configured as a NFS ( Nightmare Network File System ) Server.

Bye


This article is a sort of “Post-it®”, a brief explanation of how to configure a network bridge with two NICs under CentOS 5.x / 6.x. After spending more than 10 minutes googling how to perform this task ( mainly reading about ( l ) users that didn’t have a clue about what a network bridge is or, worse, asking how to bridge n-thousand VM while performing routing having iptables misconfigured… ), I thought it was better to write everything down in “safe place”: what’s better than my blog?

So, this is how I have made the bridge on Nighthawk ( a double Pentium III – 800 MHz with a Gig of RAM and a pair of UWSCSI3 disks ), under CentOS 6.0.
The two NICs are both based on an Intel 82559 chip. The first one is integrated into the motherboard, while the second one is on a PCI slot.

OBVIOUSLY, a network bridge has ONE MAC address ( could be the same of one of the two NIC or could be a different one ) and ONE IP address, unless your playing with aliased interface over a bridge, but this is not the case.

The integrated NIC is eth0, the NIC on the PCI slot is eth1 while the network bridge is nbr0.

So, these are the configuration files:

# /etc/sysconfig/network-scripts/ifcfg-eth0
DEVICE="eth0"
HWADDR="00:30:48:AA:BB:CC"
ONBOOT="yes"
BRIDGE="nbr0"

# /etc/sysconfig/network-scripts/ifcfg-eth1
DEVICE="eth1"
HWADDR="00:90:27:DD:EE:FF"
ONBOOT="yes"
BRIDGE="nbr0"

# /etc/sysconfig/network-scripts/ifcfg-nbr0
DEVICE="nbr0"
TYPE="bridge"
BOOTPROTO="dhcp"
IPV6INIT="yes"
IPV6_AUTOCONF="yes"
ONBOOT="yes"

The bridge takes its IP address via DHCP. If a static address is required, file ifcfg-nbr0 must be changed according to what is reported into the RHEL Deployment Guide.

Bye


Mar 18

This is my first post about IPv6 and, as you can read in the title, is gonna be the first of a serie.

One thing that is driving me mad during these days is that on many sites, blogs, forums etc. there are a lot of explanations about how IPv6 works, but really few explanations on how to make it working.

So now I’m not gonna explain what IPv6 is, or how it works, because I’ll assume that the reader has at least a basic IPv6, IPv4 and UNIX / NetBSD understanding.
I’m gonna write down the steps I performed to get IPv6 connectivity ( assuming your ISP isn’t already giving you native IPv6 connectivity, otherwise you can stop reading now ) using a D-Link DSL-2640B aDSL modem-router with a standard firmware ( support IPv4 only ) and a NetBSD/i386 5.1 based router ( any computer with two NICs ).
I currently have no firewall on the DSL-2640 and no services / daemons running on the NetBSD router.

In this first post I will illustrate how to get IPv6 connectivity via a tunnel broker. There are many free services availables. I choose Hurricane Electric ( HE from now on ) just because a pair of friends already use it and told me that it works.

The tunnel created with an HE’s endpoint is static and request that you have a public pingable IPv4 address.
If you are behind a router that does NAT, like me, this could represent a problem, so I created this page to test if I can ping my public IPv4 address.
The solution I found was to move the NetBSD router to the DMZ, so when someone ping my public address, actually it sends ICMPv4 requests to my NetBSD router.

Creating a tunnel on the HE website is pretty simple, just look at the image below:

Create tunnel with HE

  1. Click;
  2. Insert your public pingable IPv4 address

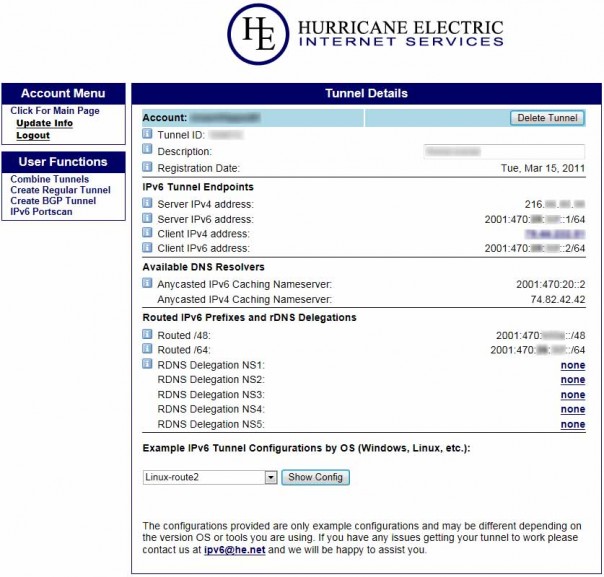
HE tunnel details

Just remember, for this specific configuration, when configuring the tunnel interface on the router, not to use your public IPv4 address but to use the private address of your IPv4 gateway. So, to create a tunnel in NetBSD ( 4.x or 5.x ) type the following as root:


# ifconfig gif0 create
# ifconfig gif0 tunnel $Your_IPv4_gateway $Server_IPv4_address
# ifconfig gif0 inet6 $Client_IPv6_address $Server_IPv6_address prefixlen 128
# route -n add -inet6 default $Server_IPv6_address

The tunnel should be up and ready. Just try to send an ICMPv6 echo request to someone using ping6, like ipv6.google.com ( you have to create and configure /etc/resolv.conf first ).

If you succeed, congratulations! You’re now on the IPv6 internet and halfway in configuring the router!

In the next part I’m gonna explain how to enable routing, configure the router advertisement daemon and make the configuration permanent.

Bye


The procedure I’m gonna explain is mainly a remainder to myself.

But first of all a little introduction.

Back in the good ol’ days of MS-DOS there were four types of soundcard:

  • AdLib Pro Audio Spectrum ( and compatible chips/cards )
  • Creative Sound Blaster 16 ( and compatible chips/cards )
  • Creative Sound Blaster Pro ( and compatible chips/cards, I own one * )
  • Windows Sound System ( and compatible chips/cards )

* An Oak Technology Mozart Sound System 16 bit, Sound Blaster Pro compatible.

The way to install the driver files for a Sound Blaster card under MS-DOS, although not really easy, was more or less standard.
Launching a setup ( the easy part ), followed by some tweaking of the autoexec.bat and config.sys files ( the complicated part ) and hopefully nothing more.
Under Windows, things became a little more complicated and with the begin of the PnP ( actually, that means PLUG and PRAY ) era, things got even more complicated.
The final user is unaware of this because, over the time, setup programs became “smarter” and got the job ( installing the drivers and configuring the operating system ) done well almost always. That simply means sometimes they fail.

Some days ago, I had to install a Creative Sound Blaster Live! 5.1 Digital into Eagle, my 2.66 GHz Pentium 4 HT. Eagle already has an integrated audio chip, which works, but is not powerful enough for some tasks and doesn’t support ASIO drivers very well.

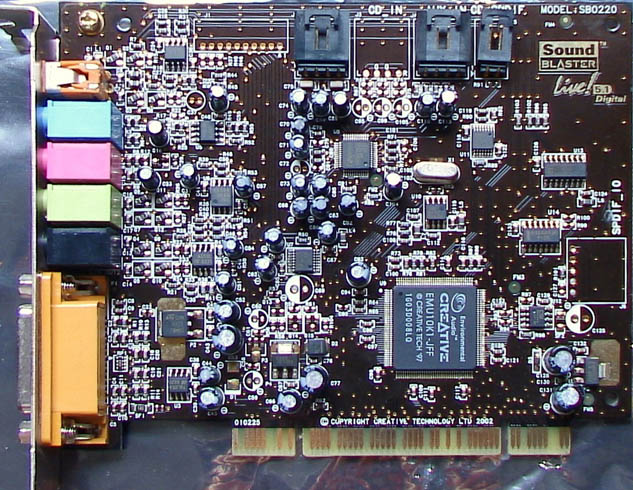
Picture of a Creative Sound Blaster Live! 5.1 Digital sound card

The SB Live! 5.1 instead is built around the EMU10K1 audio processor that, ten years ago, was one of the most powerful audio processors on the market and was used also on semi-professional equipment, so the decision to put the SB Live! 5.1 into Eagle was rather straightforward.

I already had the drivers for the card, downloaded from the Creative website three or four years ago ( they are 8 years old now and, no, Creative didn’t released a new version since 2003, so these are still the same NT 5.x drivers ) and I have already installed it once upon a time, so I knew just one or two things about the setup…

As I wrote, just above, sometimes the drivers setup programs fail. Needless to say that this setup fails just at the beginning.
The setup downloaded from the Creative support website, LiveDrvUni-Pack_ENG.exe, usually fails to locate the SB Live! installed into the system and quit without doing anything.
Although is an executable, actually is a self expanding archive that can be opened, for example, using WinZip.
Inside the audio\drivers directory there are some files that should be the drivers needed to use the card with Windows NT 5.x.

But using the Windows wizard to install the drivers doesn’t work for me as the OS tells that drivers for the device can’t be located in the folder… in which they actually are.
So I launched ctzapxx.exe, and that seemed to work, but the system failed to reboot ( Windows XP hanged during shutdown ). At the next boot, no drivers were installed in the system.
The solution was to launch ctzapxx.exe and, when asked to reboot the system, power-off the system using the switch of the power supply. At the next boot, drivers were installed and working.

Bye


Dic 31

/* A truly complicated way to... do it :) */

#include<stdio.h>

int main( int argc, char* argv[] )
{
   int values[] =
   {
      0, 25, 15, 0, 9,
      -89, 46, 23, 18, -87,
      57, 12, -4, 17, -82,
      18, -2, 1, 0, -16
   };
   char c = ( 'N' + 'C' ) / 2;
   int i;
   for( i = 0; i < 20; i++ )
   {
      c += values[ i ];
      printf( "%c", c );
   }
   return 0;
}

/* Bye */


I was very busy during the last two months so, as a result, I had little to no time to write something.
Something interesting at least…

During some spare time of the last week,  I built a really simple and cheap headphone amplifier. I needed one because sometimes I like to listen to some sat radio station (especially for news) and I don’t want to leave the TV on only to use it as an headphone amplifier.

I  wanted to keep the complexity low, really low, so I decided to use a pair of ICs instead of four ( one amplifier and one buffer per channel ) or more transistors.
There are various IC audio amplifiers. Some are huge AB class amplifiers able to deliver dozens of Watt to a 4 Ω load. That is not my case, because headphones usually have an impedance of 16 Ω or more.

The one I selected was the National LM386, a small 8 pin IC in a DIL package.
Considering the low output power, there is no need for a heatsink. Moreover, the air inside the case shouldn’t be hotter than the air outside, despite the little heat generated by the voltage regulator.
Using the LM386, only two external cap per channel are required. Without any further component, it’s easy to obtain a fixed gain of 20.

Talking about the PS (power supply), my idea was to use a cheap wall mount PS but, as many people know, sometimes ( *almost always* ) “cheap” means “unregulated-with-an-output-voltage-completely-different-from-the-rated-one”. Furthermore, a PS like that usually have different type and size of plugs, some with inverted polarity ( many devices use a plug with the negative/ground on the outside ).
So my amplifier needed to have its own voltage regulator and at least a diode to prevent damages in the case I or someone else accidentally connect a PS plug with the wrong polarity.

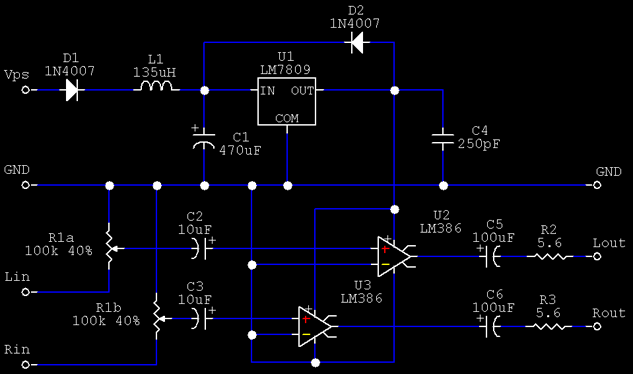
Now lets see the schematic:
Amplifier schematic

  • Vps ( and GND of course ) must be connected to a PS with a minimum rated output of 12 V;
  • D1 could be any 1 A diode, same for D2. 1N4001, 1N4002, etc are perfects;
  • L1 is not essential. Without it I hear a stronger 100Hz noise, depends by your PS;
  • C1 could be smaller or bigger, again depends by your PS;
  • U1 is the standard LM7809 3 pin fixed voltage regulator in the TO220 package. A very small heatsink is ok;
  • The value of C4 is not critical, but should be mounted close to U2 and U3;
  • Lin and Rin are the two audio input from RCA plugs;
  • R1a and R1b are two halfs of the double 100 kΩ potentiometer R1. R1 should be logaritmic;
  • C2 and C3 could be smaller (but equals);
  • About C5 and C6, the larger, the better;
  • R2 and R3 must be equals and not bigger than 8 Ω;
  • Lout and Rout are the output to the jack plug.

Now some technical details:

  • Vps must be greater or equal to 12 V and lower than 35 V. Assuming a 2V drop on U1 and a 0.7 V drop on D1, this lead to a minimum Vps of 11.7 V. As Vps raises, so do the temperature of U1 so be careful about heat generation;
  • The input impedance of the LM386 is 50 kΩ, so the value of C2 and C3 can affect the bandwidth. Keep in mind that usually there is also a cap on the output stage of the audio source, so actually there are two caps in series: the total capacitance is smaller than that of the smallest cap;
  • If you want to add a LED, simply connect it in series with a 1 kΩ resistor between the output of U1 and GND;
  • R2 and R3 are sorta short circuit protection;
  • There isn’t a Zobel network in this project. If you think you need one ( e.g. the amplifier oscillate ), add a 10 Ω resistor in series with a 50 nF cap between the outputs ( before R2 / R3  ) and GND.

I have used many spare parts to build this amplifier, but I think that 15 € should be enough to buy all the components.
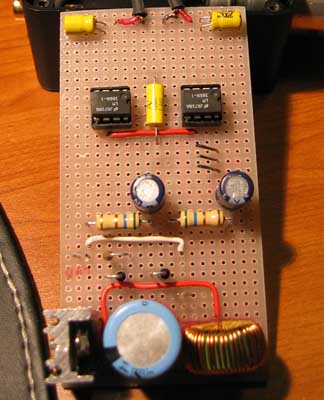
Some spaces I left on the board are needed because of the various connectors that are very close to the board itself.

Amplifier board

I used a 0.5 mm solder wire and I made most of the link on the copper side of the board.
I used a plastic enclosure, but if you plan to use a metallic one, beware of ground loops and remember to insulate any plug from the enclosure chassis.
Could be a nice project if you are relatively new in building electronic circuit, but I don’t suggest it as the first circuit to build, because doing problem solving on audio circuit could be really frustrating.

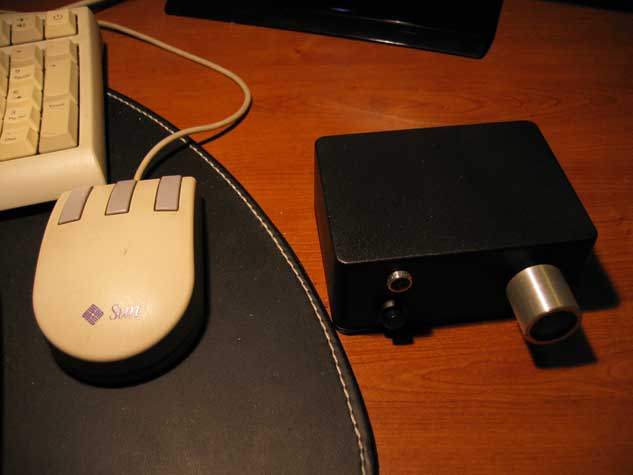
The result (mine) is this, black and only a bit greater than a mouse.
Amplifier compared with the size of a mouse
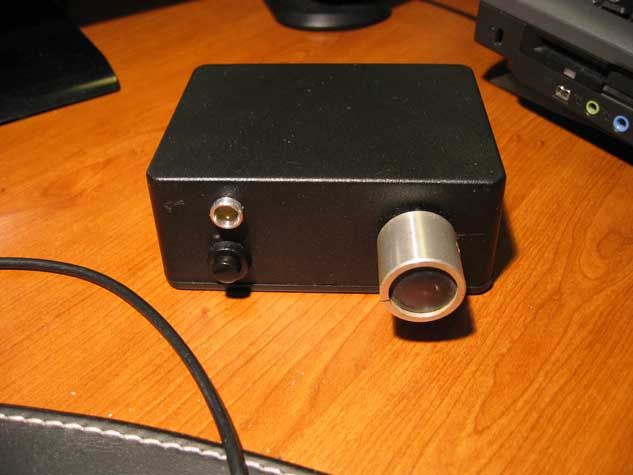
The front side of the amplifier with the power LED, power switch and the volume knob.
Amplifier front side
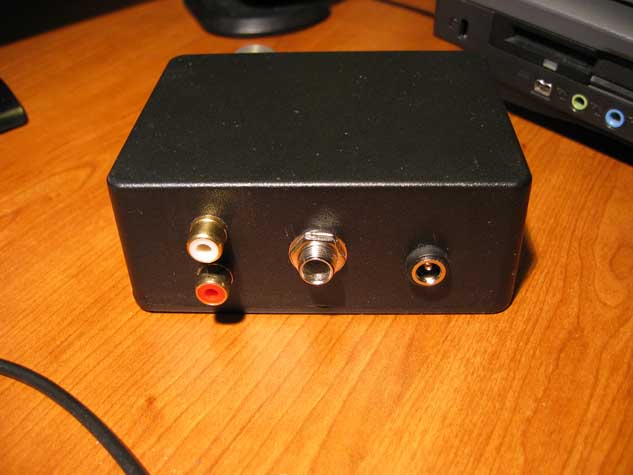
The rear side of the amplifier with the RCA plugs, 6.3mm jack plug and the PS plug.
Amplifier rear side

Bye


Ott 31

Recently I needed a *BSD machine to test a software I’m developing with two friends for an university research project.
My choice went for NetBSD of course ( latest version is 5.0.2, but the 5.1 is coming, anyway…).
But I can’t use Mirage, my UNIX (Oracle Solaris) server, for two reasons:

  • The only disk inside has Solaris on it and I don’t want to remove it, install NetBSD, then reinstall Solaris again;
  • I need two network cards and  Mirage has only one ( the Happy Meal ).

Because Raptor is powerful enough, I decided to virtualize NetBSD on VirtualBox, so I can have up to four network cards, as much RAM (and CPUs) as I wish, remote desktop, etc.

So, I created a virtual hard drive, then I created a virtual machine and tried to boot it… No way… Some strange errors at boot, during kernel loading…
Now, the NetBSD slogan is “Of course it runs NetBSD”, meaning it is able to runs on almost anything with a CPU and some RAM, including the toaster.
Being unable to run on one of the most used desktop virtualization software is unacceptable. It has to be my fault, I’m missing something.
Something critical for every OS I’ve used (and they’re many) is the / or the C: partition. The boot loader could be able to launch the kernel, but the kernel could not be able to find and mount the partition.

So, get my advice. When creating a virtual machine for NetBSD, add a SCSI controller to handle the virtual disk instead of using the classical IDE interface or the newer AHCI interface.

Bye


Questa guida è stata realizzata su richiesta di… ehr… un “cliente” con la necessità di monitorare le operazioni di un altro utente sul proprio (del mio “cliente”) computer.

Le immagini sono state prese da una versione in lingua italiana di Windows XP Professional. Su Windows Vista / 7 non cambia molto.

Importante: Accedere come un utente membro del gruppo Administrator (XP) o eseguire il setup come amministratore (Vista / 7).

  1. Eseguire il programma di installazione.
  2. Selezionare la lingua (in questo caso, inglese).Language selection dialog
  3. Alla schermata iniziale cliccare sul pulsante ‘Next’.
  4. Alla schermata ‘Version Comparison’ cliccare nuovamente su ‘Next’.
  5. Alla schermata ‘License Agreement’ cliccare su ‘I agree’.
  6. Alla schermata ‘Information’ cliccare su ‘Next’.
  7. Alla schermata ‘Select Destination Location’, scegliere dove installare i file del programma.
    • Default: C:\Windows\System32\MPK
    • Altre possibilità: C:\Programmi\MPK (Windows XP Italiano); C:\Program Files\MPK (Windows XP inglese e Windows Vista / 7 a 32 bit); oppure altri percorsi a sceltaDestination Location Selection
    • Considerazione personale: installarlo sotto C:\Windows\System32 non mi sembra una buona idea…
  8. Alla schermata ‘Select Additional Tasks’ si può levare il segno di spunta da ‘Create a desktop icon’, quindi cliccare su ‘Next’.Uncheck 'Create Desktop Icon'
  9. Alla schermata ‘Ready to Install’ cliccare su ‘Install’.
  10. All’ultima schermata cliccare su ‘Finish’.
  11. All’avvio del programma compare una schermata che suggerisce di acquistare la versione completa. Cliccare su ‘OK’.
  12. La procedura guidata di configurazione si aprirà automaticamente. Deselezionare ‘Monitor all users’ per non monitorare tutti gli account del computer e poter scegliere selettivamente, quindi cliccare su ‘Next’.Uncheck 'Monitor all users' at the first configuration wizard dialog
  13. Selezionare gli utenti che si vogliono controllare, quindi cliccare su ‘Next’.
  14. Selezionare le attività degli utenti che si vogliono controllare, quindi cliccare su ‘Next’. Le opzioni non selezionate  non sono disponibili nella versione gratuita.Selection of the user activities to monitor
  15. Selezionare il livello di “invisibilità” del programma, quindi cliccare su ‘Next’. Le opzioni non selezionate non sono disponibili nella versione gratuita.Inivisibility options
  16. Selezionare una combinazione di tasti con cui richiamare il programma, quindi cliccare su ‘Next’.hotkey selectionE’ comunque possibile richiamare il programma mediante l’icona posta nella tray bar.traybar icon
  17. All’ultima schermata deselezionare ‘Check updates automatically’, quindi cliccare su ‘Next’.last dialog
  18. Fine

Adesso il programma è attivo e sta registrando l’attività degli utenti che si è scelto di controllare. Una volta richiamata la finestra principale del programma è sufficiente selezionare uno degli utenti sotto controllo per visualizzare i dati registrati.


This guide has been made on demand for… ehr… a “customer” with the need to control the actions of another user on his (my “customer”) computer.

Images come from an Italian language version of Windows XP Professional. On Windows Vista / 7 there aren’t many changes.

Notice: login as an user member of the Administrator group (XP) or run the setup as an administrator (Vista / 7).

Refer to the italian version of this howto just up here for the images.

  1. Run setup.
  2. Select language.
  3. At the first dialog, click on ‘Next’.
  4. At the ‘Version Comparison’ dialog, click on ‘Next’.
  5. At the ‘License Agreement’ dialog, click on ‘I agree’.
  6. At the ‘Information’ dialog, click on ‘Next’.
  7. At the ‘Select Destination Location’ dialog, choose where to install the program.
    • Default: C:\Windows\System32\MPK
    • Other options: C:\Programmi\MPK (Windows XP Italian); C:\Program Files\MPK (Windows XP English and Windows Vista / 7  32 bit); other locations
    • Personal thought: installing under C:\Windows\System32\ doesn’t sound like a good idea to me…
  8. At the  ‘Select Additional Tasks’ dialog, uncheck the ‘Create a desktop icon’ option, then click on ‘Next’.
  9. At the ‘Ready to Install’ dialog click on ‘Install’.
  10. At the last dialog, click on ‘Finish’.
  11. The first time the program start, it asks to buy the complete version. Close the dialog by clicking ‘OK’.
  12. The Configuration Wizard will run automatically. Deselect ‘Monitor all users’ to choose the user to control.
  13. Select the users to control, then click ‘Next’.
  14. Select the user’s actions to record, then click ‘Next’.
    Unchecked options are unavailable on the free version.
  15. Select the desired “invisibility”.
    Unchecked options are unavailable on the free version.
  16. Select the hot keys to unhide the program.
  17. At the last dialog, click on ‘Finish’.
  18. The end.

Now the program is active and is recording the activity of the monitored users. After unhiding the main window, just select a controlled user to see the recorded data.

Bye


So here I am, configuring my UNIX server (actually a Sun Ultra 5 workstation), Mirage, installing Oracle Solaris 10 for the second time after a disk change.
The disk on which Solaris was installed was too damn noisy to allow me to work at night so I just put another IBM 9GB SCSI disk and went through the (really long) installation process.
So, after installing the OS, I started configuring the system (adding users, configuring daemons etc.). In the meanwhile, I wanted to listen to some music so I just plugged my headphones into the corresponding jack, pressed ‘Play’ on the media player and… here it came…
the internal speaker.

The internal speaker is active by default, but, unlike others operating systems, those of the Ultra 5 / 10 are not only used to play ‘beep’ but also to play system sounds (could be useful) and other sounds (it’s annoying).

The only working solution I’ve found on the web (beside meaningless chats), is the following:

$ audioplay -p line

Now I should decide about putting that line on my ~/.profile file, but at least now I can listen to some music without that annoying noise.


E così, eccomi qui intento a configurare il mio server UNIX (effettivamente una workstation Sun Ultra 5), Mirage, installando Oracle Solaris 10 per la seconda volta dopo avere cambiato il disco rigido.
Il disco su cui era installato Solaris era troppo dannatamente rumoroso per permettermi di lavorare di notte, così ho semplicemente montato un altro disco IBM SCSI da 9GB e ho effettuato l’installazione (veramente lunga).
Dopo aver installato il OS, ho iniziato la configurazione del sistema (aggiunta degli utenti, configurazione dei demoni, ecc.). Nel frattempo, visto che volevo sentire un po’ di musica, ho inserito lo spinotto delle mie cuffie nel jack corrispondente, ho premuto play nel media player e… ecco il problema…
lo speaker interno.

Lo speaker interno è attivo di default, ma, a differenza di quanto accade in altri sistemi operativi, quelli delle Ultra 5 / 10 non sono utilizzati solo per riprodurre il ‘beep’, ma anche per riprodurre i suoni di sistema (può essere utile) e altri suoni(è seccante).

L’unica soluzione funzionante che ho trovato sul web (a parte le chiacchiere inutili), è la seguente:

$ audioplay -p line

Adesso devo decidere se inserire questa riga nel mio file ~/.profile, ma almeno, per adesso, posso sentire un po’ di musica senza quel rumore fastidioso.

Bye